Yuto Usage Guide
Introduction
Yuto seamlessly integrates the powerful Meilisearch engine into your website, unlocking lightning-fast search capabilities with hyper-relevant results.
Meilisearch is an open-source, blazing-fast, and feature-rich search engine. It’s designed to deliver instant search results to your websites with high relevance and speed.⚡️🔎
With Yuto, your users can enjoy instant search responses, typo-tolerance, customizable ranking rules, and faceted search features provided by Meilisearch. Boost user retention and satisfaction on your website with enhanced search capabilities.
Installation
There are three ways in which you can install Yuto. The easiest is to choose and install one from within the dashboard. Let’s take a look at it.
- Upload via FTP:
If you’ve got a zip file and don’t want to use the web dashboard to upload it, another possibility is through FTP (preferably, SFTP, which is the secure version of FTP). For this, you would need (S)FTP credentials from your web host, like the username, password and server information. Once logged in, navigate to the /wp-contents/plugins/ directory and upload the plugin. The unzipped form should sit in this directory. Once this is done, open your WordPress dashboard in a web browser and navigate to Appearance >Plugin. The plugin you just uploaded should be listed there and can be activated. - Install from the dashboard:
Head over to Appearance -> Plugins Add New. Plugins will be displayed here. You can also install the plugin directly from this page. Once installed, you’ll see the Activate button – click that too. This will bring you back to your Plugins dashboard, where you can see the current plugin activated. - Install from a ZIP file:
If you have a plugin in the form of a zip file, you can install it manually. One way is to upload the zip file from the dashboard. To do that, go to Appearance -> Plugins -> Add New. At the top, you should see a button to Upload. Click that and choose your zip file, then Install Now. Make sure to activate it as well.
Configuration
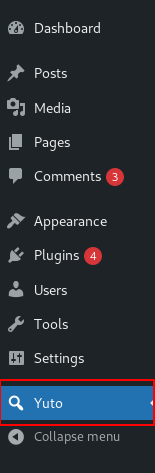
After activating the plugin, navigate to the Dashboard and select “Yuto” from the menu.
1. Connection
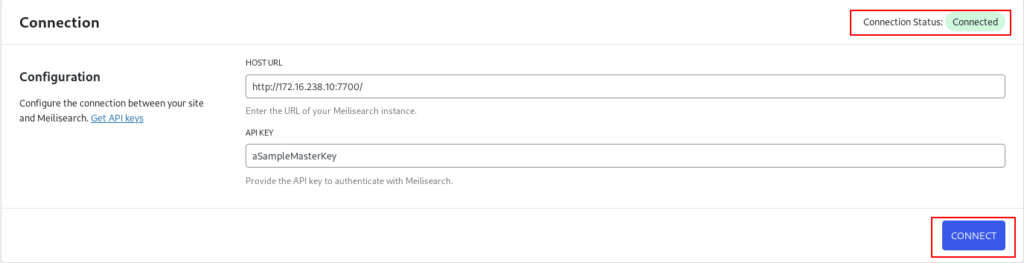
The Connection settings section allows you to link your site to your Meilisearch server. To establish this connection, you’ll need to provide the following information:
- Host URL – URL of your Meilisearch instance.
- API key – API key to authenticate with Meilisearch.
For detailed instructions on obtaining your Host URL and API Key, refer to the documentation here.
After entering the Host URL and API Key, click the Connect button. The connection status will be displayed in the top right corner of the page.
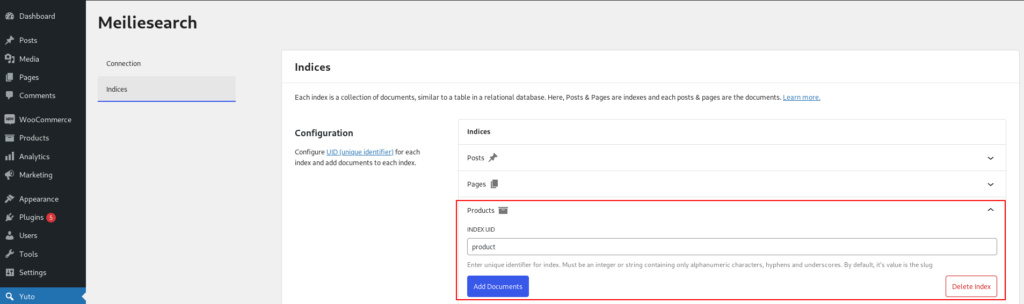
1. Indices
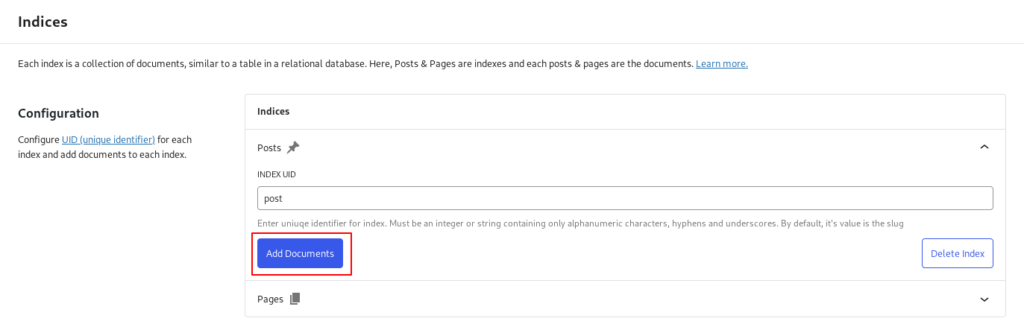
The Indices Settings section allows you to configure which types of data from your WordPress site will be indexed by the Meilisearch server. This includes options for selecting specific post types and other data types that you want to include in the search index.
By default, the settings provide options to index all available post types on your site.
Each index is a collection of documents, similar to a table in a relational database. Here, Posts & Pages are indexes and each posts & pages are the documents. Learn more about indices.
Each index tab provides option to input Index UID
Index UID is an unique identifier for index. Must be an integer or string containing only alphanumeric characters, hyphens and underscores. By default, it’s value is the post type’s slug.
To index documents of each index to Meilisearch server, you need to click Add Documents button.
Autocomplete
Yuto offers an Autocomplete Search block that you can easily add anywhere within the Site Editor. This block enhances your site’s search functionality by providing instant search suggestions as users type.
To learn more about how to add and customize blocks within the Site Editor, refer to the detailed guide here.
Once the Autocomplete Search block is added, you’ll have access to a variety of configuration options to customize the autocomplete functionality according to your needs. These options allow you to fine-tune how search suggestions are displayed and how the block interacts with your Meilisearch index.
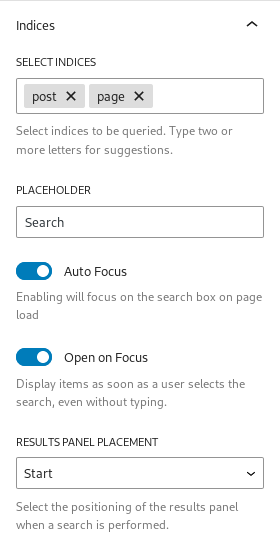
1. Select Indices
Select indices to be queried. Type two or more letters for suggestions.
2. Placeholder
Place holder text for the search bar
3. Auto Focus
Enabling will focus on the search box on page load
4. Open on Focus
Display items as soon as a user selects the search, even without typing.
4. Results Panel Placement
Select the positioning of the results panel when a search is performed.
- Search Input Width – Take the width of the search bar
- Start – Panel starts from the left end of the search bar
- End – Panel ends at the end of the search bar
- Full Width – Panel takes the full width of the page
WooCommerce
Yuto is fully compatible with WooCommerce, making it easy to index your store’s products directly into Meilisearch. With Yuto, you can provide your customers with an enhanced search experience, allowing them to quickly find the products they need in your WooCommerce store.
After installing and activating the WooCommerce plugin, follow the same procedure outlined earlier.
A new “Products” post type tab will appear under Dashboard -> Yuto -> Indices. Click the “Add Documents” button to index the products as documents in Meilisearch.
Once the indexing is complete, the products will be available in the Autocomplete Block dropdown menu. Select this option, and the search should start working with WooCommerce
Custom Post Types
Yuto offers extensive support for custom post types, ensuring full compatibility with any plugin that adds custom post types. This integration allows you to easily index various post types directly into Meilisearch. By using Yuto, you can enhance your customers’ search experience across all post types, seamlessly working with plugins such as Easy Digital Downloads, BuddyPress, and others.
After installing and activating any plugin that provides the custom post types, follow the same procedure outlined earlier.
A new post type tab will appear under Dashboard -> Yuto -> Indices. Click the “Add Documents” button to index the that post type as documents in Meilisearch.
Once the indexing is complete, the products will be available in the Autocomplete Block dropdown menu. Select this option, and the search should start working with that plugin.
Hooks
Yuto provides hooks so that you can interact/modify another piece of code at specific, pre-defined spots. You can read more about hooks here.
Currently Yuto provides Javascript hooks listed below:
Filters:
yuto_autocomplete_postTypesThis filter allows you to modify the array of index-able post types listed in Yuto->Indices panel.
Parameters
postTypesArray of index-able post types. By default, it has all the registered post types but some default post types like: ‘attachment’, ‘nav_menu_item’, ‘wp_block’ are all omitted.
yuto_autocomplete_${indexName}_header_templatesThis filter allows you to modify the header template of each indices.
indexName is name of each indices you want the header template to change for.
Parameters
contentThis parameter has the structure with text for the title of the index’s header template.
propsObject of parameters passed from Autocomplete JS to the templating function used.
yuto_autocomplete_${indexName}_item_templatesThis filter allows you to modify the result item of each indices. Each item is each result from each indices.
indexName is name of each indices you want the template to change for.
Parameters
contentThis parameter has the HTML structure for each item.
propsObject of parameters passed from Autocomplete JS to the templating function used.
yuto_autocomplete_${indexName}_footer_templatesThis filter allows you to modify the footer template of each indices
indexName is name of each indices you want the footer template to change for.
Parameters
contentThis parameter has the HTML structure for each item. By default it is empty.
propsObject of parameters passed from Autocomplete JS to the templating function used.
Usage Example:
Get Support
If you still have questions or need assistance after reading this document, please don’t hesitate to contact our support from our Support page.